Pages

Showing posts with label Assignment 1. Show all posts

Sunday, 27 May 2012

Project 2 - Stage 6

Using Thread And Yarns To Create Texture
I chose this picture because I love this colour combination.  The beautiful green grass, then the yellow going into the purple.  I made a quick sketch using coloured pencils to see what kind of stitches might work.  I then chose a range of fabrics, papers and threads in the colours of the picture.


I tried a small sample using the three colours and some simple stitches.  Fly stitch for the grass, random cross stitch for the yellow, and seed stitch over pieces of different fabrics for the purple sky. 


I made a yarn wrap with different types of yarn.  I find this a very useful exercise, even if I don't end up using these particular yarns, it does make it easier to identify the colours I need.


For the final sample I used a piece of heavyweight polycotton for the background.  I then chopped up small pieces of the different fabrics in the three colours and used pieces of net over the top to keep them secure.  I then burnt into the layers with a soldering iron, which melted them together.  I then used a random fly stitch over the entire piece to hold all the pieces together.  Over the top of all of these layers, I added beads, and sequins and additional stitching.

On the right of the page is a paper collage, which I thought looked good, but having seen it in the photograph it needs less green and more purple.

I have really enjoyed working on this piece.  I love the colours and the proportions of the original picture.  I think the final piece is alright - not quite what I had in mind when I started, I think the smaller trial sample is more like the picture.


Do you feel happy with your work?
I feel happy with the work I have created so far, although some of it hasn't worked out as I had expected and would need further experiments to get the effect I thought I would get.
Do you prefer working with stitch to drawing?  Can you begin to see the relationship between the two?I think I prefer working with stitch than drawing, my drawing experience in the past has not been very successful - but I have been happier with my drawing progress on this course - so this may change.  I have recently read the book Drawn to Stitch by Gwen Hedley and found a lot of her drawing ideas really exciting and I am going to try some of these and see what this produces. I can definitely see the relationship now between drawing and stitch.

Having worked through Stage 2, were you able to choose stitches which expressed the marks and lines of your drawing?I like the small sample that I produced initially and I think the stitches used were a good choice, I am not as happy with the finished sample and feel the stitch choice could have been different and more experimental.  I could have tried one of the messier stitches on the sky area, and a straight stitch shading for the green and yellow area.

Do you feel that you chose the right source materials to work from?
I am happy with the source material, I like the layers and colours created by the many pieces of different fabrics under the net.
Do you think your sample works well irrespective of the drawing?  Or do you think the sample is just a good interpretation of your drawing and nothing more?
I think the final sample works well irrespective of the drawing.

Which of the activities did you prefer - working with stitch to create textures or working with yarns to make textures?  Which worked best for you and why?
I like all the ways of creating texture, I especially like to use fabric folds and gathers to create the texture and add to this surface with stitch.  I think this builds up a richer surface and creates hidden areas, so that the whole piece isn't revealed at once.

Make some comments on individual techniques and sample pieces.  Did you experiment enough?  Did you feel inhibited in any way?
I think I did experiment enough and I didn't feel inhibited in any way.  Having not worked in this way before, I think I have made a good start on different techniques.  I have experimented with a lot of different ideas, many of which I intend to develop further.  I like the fabric folding and gathering and the messy stitch samples.  I also like using the ribbon yarn laid flat on the fabric and couched into place.
How do you prefer to work?  From drawing or by playing with materials and yarns to create effects?  Which method produced the most interesting work?
I prefer to play around with fabric, yarns and thread, which I think have created the most interesting samples, but I intend to try out some of the ideas from Drawn to Stitch, so this may change in the future.
Are there other techniques you would like to try?  Are there any samples you would like to do in a different way?
I intend to do more machine stitching.  This will involve finding an area where my sewing machine can stay out permanently.  The sample for Project 2 - Stage 4 - from a piece of bark I had photographed - I would do differently - build up more coloured layers of fabric to start with and then build up more layers of the ribbon yarn to give a better depth.
Is there anything you would like to change in your work?  If so, try to think out why and make notes for further reference.
For Project 2 - Stage 3 - A Sample - I think I should have chosen softer, more washed out colours; greys or browns.  I chose blacks because of the sketch I had done with a black gel pen, but after looking at the actual leaf I realised it wasn't black at all.  I think that the use of soluble fabric would have created some good effects as well.  I also need to be careful when burning the fabric, not to burn the background material!

Sunday, 20 May 2012

Project 2 - Stage 5

Stitches To Create Texture


I started this exercise by working with a pale green embroidery thread and tried various combinations of stitches.  The block of satin stitch squares really show the difference that the stitch direction/light can have on the colour, it gives the effect of a chequerboard.  On the leaf it gives a different shade to each side of the leaf.

French knots give a really good covering and interesting surface when close together, but are also good more spaced out.  Stem stitch is also good for filling in shapes, and gives a good surface coverage.  I tried the herringbone stitch and blanket stitch, random lengths, shapes and coverage.

I then tried different weights of threads and also couching different types of wool - knobbly chunky, slubby and eyelash.

The blocks of stem stitch gave the same effect as the satin stitch.  Two different shades from the same thread.  I also tried the same stitch with a random effect thread.  I tried the satin stitch blocks in various threads.   The block of French knots worked really well, good for shading.  I also tried the blanket stitch, over-sewed with different weights of thread - which gave a good coverage and would be good for shading.  I tried sewing with a ribbon yarn which was quite awkward, but gave a really interesting surface.  I also tried couching down thicker yarns, which effect I really like.

I then tried all sorts of different media, I used a coarse linen for the background.


Patterned tights - this gives a nice effect but I cut it too thin and it kept breaking, it might be better to couch it.
Ribbon yarn - laid flat on the fabric and caught down with tiny stitches.  I really like how this worked out, the texture and the colours.
Various ribbons - nice and chunky effect
Video tape - easy to sew with, shiny without glitter. 
Net, leather & raffia - all fairly easy to sew with and give good chunky effects
Plarn - made from a plastic bag, easy to sew with, matt finish
String - quite difficult to sew with, used stem stitch, chunky and matt.  The string defiantly sits on top of the fabric.
T-shirt yarn - I made the first one too thin, which stretched very thin when I stitched with it, so I tried again, cutting it wider, which gave good surface coverage.  
Leather strip - ruffled and stitched down with small stitches.
Couched piece of red net and some unspun wool.  I tried working some French knots over the top of the couching.  
I also tried some French knots over a piece of silver net and then over some sequin waste.

I then tried lots of these different techniques and ideas out and put them onto the mood boards for Stage 4.

Wednesday, 2 May 2012

Project 2 - Stage 4

Preparing To Create Texture
I looked back through my work and my sketchbook and chose six drawings to work from, and decided to create a small mood board for each one.


1.  The first one was an image of a piece of ceramic work covered with blue swirls.  I did a quick sketch using Derwent Inktense Pencils.  I chose some fabrics and threads.  Using the printed linen, I made a small sample using chain stitch to create the swirls.  I think this would also work well with couching.


2.  The next example was a photograph I took of a piece of bark with some kind of fungus growing on it.  I chose some brown linen to work on and selected some different weights of thread and wool.  I used the ribbon wool and couched it down onto the fabric then filled it in with some chain stitch.  I used some net and french knots in various weights of thread for the fungus.  This piece didn't work as well as I had hoped.  The couched ribbon got lost under the rows of chain stitch, and I don't think the funghus was prominent enough.  The piece was also quite delicate and I think it needed to be a lot bolder.


3.  For the third piece I used a drawing from my sketchbook of a pepper.  I like this drawing and thought it would lend itself to a simple stem stitch shading,  I chose thread based on the colours of the pencils I used in the drawing, then selected a range of fabrics and papers in the same range of colours.  When it came to working the sample I found an old striped scarf and decided to try that instead of the shading.  I crinkled it up and stitched it down using a simple running stitch.   I like the effect but it doesn't really portray the smoothness of the pepper, and although I like the effect it created I think my original idea of the stem stitch shading would have been more appropriate.


4.  The fourth image I chose to work from was a quarter of a sketch based on a gerbera.  I chose fabrics and threads then did a small sample using stem stitch as shading - using two strands of thread, mixing the two colours in between.  I then tried stitching different fabrics down, using different colours of thread.  I like this and think this would definitely work to produce a really good shaded piece.


5.  The fifth piece is based on my biro drawing of the mushroom gills.  I picked out some black, white, grey and silver thread and a range of fabrics in similar colours.  I used a piece of grey organza as a background and couched pieces of the fabric onto it.  I like how this piece has turned out, although a bit of restraint was perhaps needed.  If I was going to develop this piece I would probably just stick to using net and organza.  I would also like to try drawing the gills with batik and then work onto that.


6.  The last piece is based on my drawing of a dried orange slice.  I again chose a range of fabrics and threads based on the colours in my drawing.  I made a small sample by cutting small pieces of all the fabrics and stretching a piece of net over the top. I stitched the net down using stem stitch.  I created the edge using a random cross stitch.  I tried two different techniques on the orange flesh.  One was seed stitch and the other was rows of loose chain stitch.  I decided not to use black thread and I thought it detracted from the lovely orange colour too much.

Project 2 - Stage 3

A Sample
I chose my leaf skeleton sketch to work from.
  
I wanted to create a piece that was delicate but also gave the feeling of decay.  I chose different lightweight black fabrics (lace, net, chiffon, organza) and used a stem stitch to sew them together along the vein lines of the leaf.  I then burnt these using the heat from a candle flame. 


Then using various shades of black and grey thread I stitched the fabric to a pale brown silk background, that looked similar to my water washed colour.  I used seed stitch to fill in a few areas and burnt a few more areas and the stem.  The flame just caught the silk and has left a burn mark, which I will have to be careful about if I use this method again.


I am happy with how the piece has turned out.  On reflection however I wouldn't choose black fabric to work with, but something more washed-out; grey or brown.  I chose black because I had sketched with a black gel pen, but having looked again at the actual leaf skeleton, I think it would have been better in lighter colours. Over-stitched, soluble fabric would probably have given a good effect for the decay as well.


Tuesday, 3 April 2012

Project 2 - Stage 2

Exploring Marks And Lines Through Stitch Techniques
I have really enjoyed doing this series of mark making using different stitches.  I chose chain stitch first because that is the easiest.  


With differing pink threads, I tried: 
  • straight lines in different colours
  • detached chain stitch
  • zig zag lines
  • lines of chain stitch in different yarns and threads
  • detached chain stitch in different yarns and threads
  • spiral
  • lines of chain stitch, close together in differing shades, mixed together where the colours joined
  • elongated chains
  • lines of chain stitch coming out of a central point
  • messy chain stitch
I like the detached chain stitch, the shaded sample and the messy chain stitch the most.  I think they all create a really good texture and the shading worked really well by mixing the two joining colours.

Next I tried running stitch, with green threads:
  • lines - close together getting wider apart
  • wavy lines
  • cross hatched
  • box in lines
  • running stitch with cross hatch
  • zig zag lines
  • running stitch in different directions
  • random running stitch to create tone
  • different threads 
  • basket weave type pattern
  • spiral pattern
  • running stitch with gold thread woven through stitches
  • running stitch with messy threads woven through stitches
I like the random running stitch showing tone, I think this could really be used to explore tone in texture.  I like the basket weave and the spiral pattern, but again my favourite is the messy weaving through the running stitch.


Lastly I tried out all the new threads I had bought.  I think this set of examples are the best.  I like all the techniques used here.  I am not very keen on the fabric I have used - I think it is a poly cotton and although it was nice and taut in the hoop, it is now a bit puckered.  I am going to try some cotton poplin next.  I also tried some stem stitch.  I don't usually have a lot of success with this - but I like the way the lines of different colours have worked out - it is like coloured pencil shading.
  • rows of chain stitch in different threads
  • back stitch with side stitches in variegated thread
  • single thread, varying widths apart to show tone
  • single thread in various shades
  • wavy line, chain stitch, grid
  • stem stitch shading
  • running stitch spiral
  • detached chain stitch, messy
  • zig zag back stitch
  • zig zag back stitch, metallic thread
  • lines of loose chain stitch, worked over each other
  • running stitch with messy thread woven through the stitches
  • zig zag running stitch
  • cross hatching
I didn't like working with the metallic thread at all, although I love the metallic effect.  I think all of these examples have worked well.

Project 2 - Stage 1

Developing Your Marks
Stage 1 - Preparation
Can't wait to get started on the stitching!


I had already made a series of colour bags - although I have accumulated so much stuff that they are colour boxes!  I don't have very much plain cotton in the colours required so I will have to buy some of those and I am going to have to get some new needles, but this is going to have to wait until I get to the shops, so I am just going to make a start with what I have got.


I am going to stick to hand stitching at the moment - I find it easier to just pick it up - wherever I am.


I had already bought a few new coloured threads last week, but as most of my embroidery cottons are very old and left over from other projects, I decided to treat myself to a few different ones this week.  I went to a lovely needlework shop near where I live and had a good look through all the beautiful threads that she stocks and chose a few different kinds - just to see what each was like to work with.


Project 1 - Stage 4

Working From Your Sketchbook
Having looked back through the work I had done so far, I chose four images to work from.  The underside of the funghi and the turkey tail from Stage 3: Exercise 3, the paper collage from Stage 2: Exercise 4 and a photograph from my sketchbook, of some unusual tree bark and plant growth.


Have you thought of working in this way before?
I have worked in this way before, not quite to this extent though.  I have never really made the connection between applying the marks to the drawings.  It wasn’t until my friend, having looked through the marks, said you shouldn’t have any problems drawing if you can make all these different marks.  The marks are easy though – they don’t have to look like anything, or be in perspective.

Were you able to be inventive about the range of marks you made?
At first a lot of the marks I made were very similar, but towards the end of the exercise I found it easier to be more inventive and discovered some surprising results.  I really like the wavy line using the three different media and the vortex in the tone exercise.


Did you explore a wide range of media?
I did explore a wide range of media – over the years I have acquired all sorts of different media and I am glad that I can now use them.

Are you pleased with what you’ve done?  Will it help you to approach drawing more confidently?
I am pleased with what I have done.  I am trying now to see my drawing as more of a mark making exercise, hoping that this will help me draw more confidently.  I am still not all that happy about my drawings.  I would like to be more relaxed - in attitude and style.  I find it very difficult to make myself do the work in my sketchbook, but have decided to just get on with it; if it doesn’t look like I expected it to look I am just going to carry on until it does.

Which exercise did you most enjoy?  Why?
I enjoyed the crayon rubbings, this was more successful than I expected it to be and very easy to get some interesting results.  But the exercise I enjoyed the most was block printing.  I really enjoy printing of all kinds – the results are so unexpected – you never quite know what you are going to get.  I would like to do more printing, especially on to fabric.

Which media did you most enjoy working with?  Why?
I enjoyed working with the charcoal and the graphite stick, although these are both really messy afterwards which puts me off a bit.  The marks made by the charcoal are very satisfying and varied, both in style, weight and tone.  The graphite stick was really smooth to use and I love the colour of graphite on the page.  Again the marks it makes are very satisfying.  The block paints (that I bought at school) are also lovely to work with, they can be used thickly or watered down and used as a wash, and once dry can be over painted.

What other forms of mark-making could you try?
I would defiantly like to try more types of printing – screen / mono / collagraph.  I have also seen “How to make a cola pen” on the internet; so I am going to try making one and using it with ink.  I haven’t tried using oils, applied with a knife or spatula.

How will these exercises enrich your textile work in the future?
I have found it a lot easier to relate the marks to different stitches, so I think it will make it easier to create specific textures by first drawing them – using the mark making techniques - then relating these to stitch.

Project 1 - Stage 3: Exercise 2

For this exercise I chose to look at four different objects.  The first one was a sea shell.  I made a series of studies using white gel pen on black paper.  I tried not to be too analytical about making it look like a real shell and just concentrated on the shapes and lines.  I like the spiral drawing and the curve going into the shell.  I think the gel pen on the black paper has worked well and has a translucent quality that is similar to the shell.  I also used coloured pencils on the black paper which I also like.  I think the different coloured lines and shapes are very evocative of the shell shape.


The second item I looked at was a snail shell.  I just tried to do really quick sketches and tried not to think to hard about it looking real.  I am not pleased with these at all, they all look a bit flat.


The third object was a leaf skeleton I found in the garden.  This was really difficult to draw.  It was very delicate and fragile and I am not very good at fine detail.  I think the most successful of these sketches is the biro and watercolour wash, but I also like the ink and coloured pencil one at the bottom.


The fourth object I looked at was a dried up corn-husk.  I thought the pattern on this was interesting and tried it out in various media.  I think the coloured pencil and pencil was the most successful.


Project 1 - Stage 3: Exercise 1

Using Marks To Create Surface Textures
I chose two images, one of funghi and the underneath of a mushroom and one of turkey tail.

I tried the funghi in various media
  • pencil
  • biro
  • coloured pencil and white gel pen
  • inktense coloured pencils
I think the biro is the best image, it has depth and texture and I like drawing with a biro.


For the turkey tail I used
  • inktense coloured pencils
  • oil pastels
  • block paints
I think the inktense pencils worked really well, I like both the techniques with these pencils, but I think the top stripey one is most representative of the image.

Saturday, 17 March 2012

Project 1 - Stage 2: Exercise 4

This exercise was really enjoyable.  I tried to do a selection of ideas from each section of the supplied list.

Rubbings:  Using a variety of household impliments - a cake slice, a plastic doilly, a grater, a stencil, a plastic lid, some sequin waste, some sticky lace tape.  I used a crayon to make the rubbings.


These are all images made from things I found outside - a grid, a clock, cement rendering and a rough plaster wall.


Wax Resist: Marks made with a pale wax crayon, then washed over with watery block paints.


Block Printing: This was a really fun - using all sorts of found objects to print with.  I used acrylic paint with a credit card, old wooden blocks, various lids, the end of a paintbrush and some old game pieces.  I then tried painting a block of colour and scratching into it with a comb and using the paint on the comb to make a pattern.


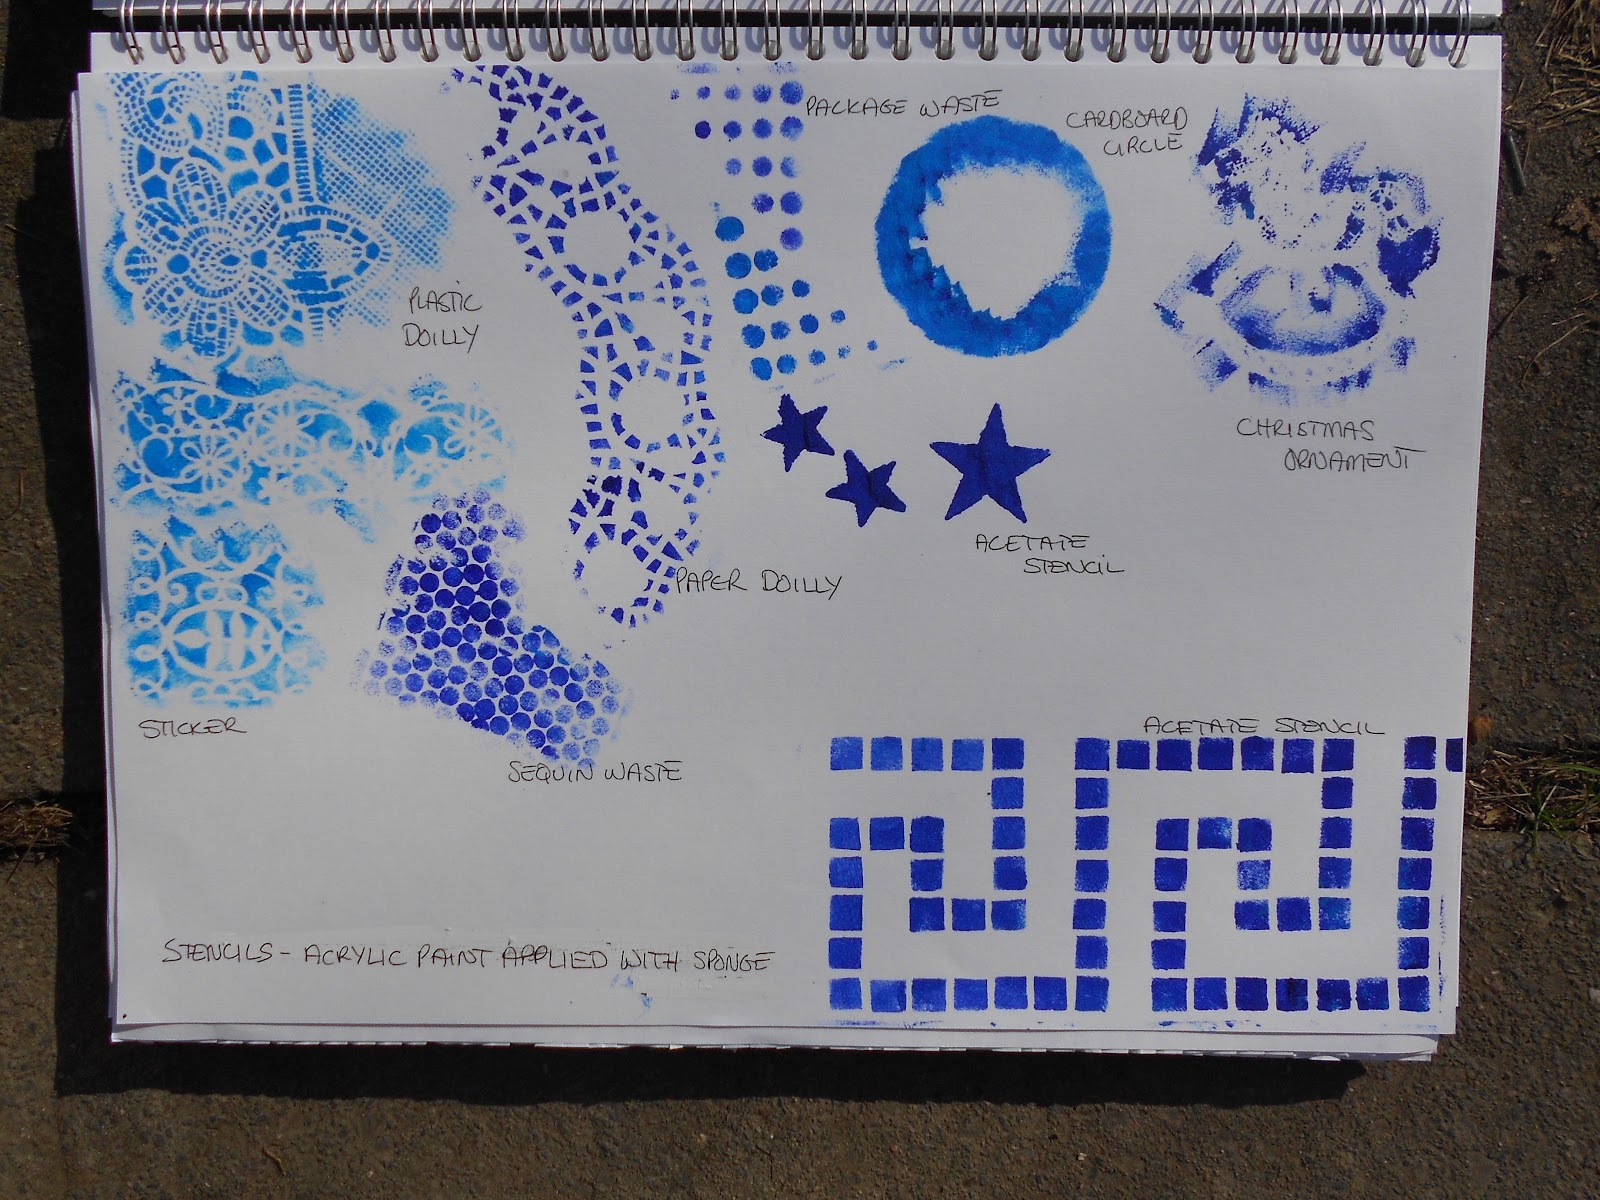
Stencils: These are all made using stencils.  I used a sponge and acrylic paint.  Some of the trials were not as successful as others.  I used a plastic doilly and a paper doilly, both of these were successful and made lovely clear patterns.  The sequin waste also made a nice pattern.  The circle of cardboard and the christmas tree ornament were not successful - OK for the shape but no detail on the ornament.  I think the acrylic paint was too thick.


Bleach: I painted bleach onto tissue paper, and a variety of other papers.  The bleach took the colour out of the tissue paper really well.  It didn't work quite so well on the other papers and some of the papers I tried it didn't work at all.  The sugar paper and the handmade paper both produced good results but the paper bag and the brown paper only produced faint marks.


Combing: I painted blocks of colour and scratched into the wet paint with a comb.  I also tried once they were dry using bleach over the top.


Transfer / Crayon Scratch / Rubbing Away / Collage: I didn't have any fixative so I made a transfer using nail varnish remover and an ink-jet print of a photograph.  I made two prints from this, the first one is good - dark colour lots of the detail transferred (I will try using a spoon to rub the image next time (I only used the end of a Pritt stick this time), the second print (from the same image) is pale and grainy but interesting.

The crayon scratch I didn't think I was going to enjoy, I found it quite hard work to get the black crayon to cover the other colours, but once I started scratching into it I liked the result.

I didn't think that the rubbing away would be as successful as it was.  I like the results, very subtle and I think I might try this in a drawing.


Project 1 - Stage 2: Exercise 3

Exercise 3 involved repeating exercise 1 using a wide variety of colouring materials.  I tried to use as many different techniques as possible.


After uploading a number of images, I have realised that it is better to work landscape in my sketchbook.  So they are going to be a bit mixed up to start with but any new pages will be landscape.


I am loving the fact that everything I have collected over the years is now being used - this is very satisfying.  In the past I have liked using the gel pen and the ink and coloured pencil for drawing.  However, having tried all the different mediums available - I found the block paints lovely to work with, they can be used thickly or like watercolours, they don't smudge or run, and once dry can be painted over.  I like the soft pastels but again they are messy but can be smudged and drawn over like the charcoal.  I also tried out a lot different papers.


I then collected all sorts of different papers and tried out as many different techniques as possible.


Again, the squares were getting a bit neat and tidy so decided to try a page of doodles using a charcoal stick.
I like using the charcoal stick, it is very messy but produces very satisfying marks.


I tried a selection of marks and used three different medium to compare the results.  The first row is made using a charcoal stick, the middle line is made using a fineliner felt pen and the bottom row using a graphite stick.  I really like the charcoal and the graphite, they make a lot of mess, but the range of marks and tones that can be achieved is great.


Project 1 - Stage 2: Exercise 2

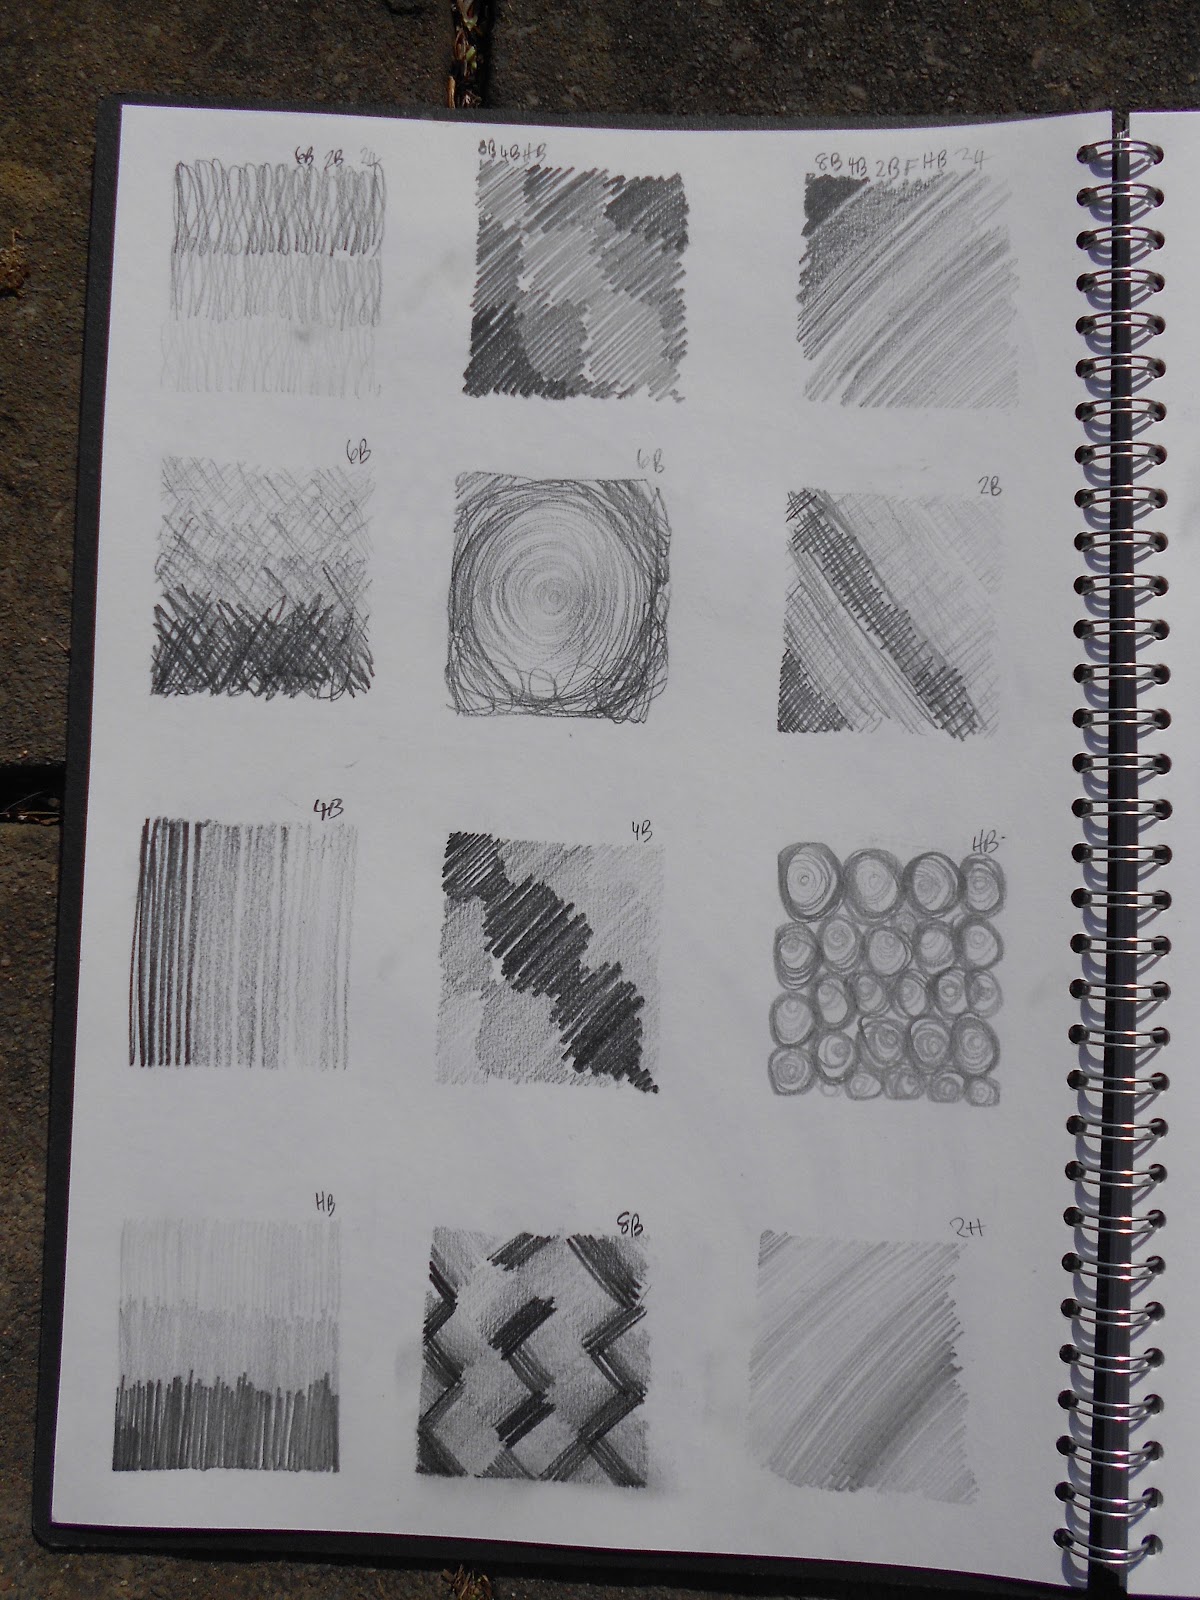
This exercise involved using the pencils and creating tone.  


I found this quite a difficult exercise at first.  I always struggle to get  a nice smooth run from one tone to another.  I decided not to worry to much about that and just get the marks down on paper.  Looking back over the squares I really like the vortex shape made with an 8B pencil and the vertical lines made with the 4B.

Project 1 - Stage 2: Exercise 1

Making Marks In An Expressive Way
Using a variety of pencils, from 2H to 8B, I made marks to represent various words.


I really enjoyed this exercise.  Although a lot of the marks are very similar there is a wide variety of tones and shapes.  I found that the word I was trying to interpret made me hold my pencil in a particular way, and the amount of pressure I used to produce the marks was different for each word.  Drawing is not my strong point but I found the mark making much easier, no pressure to produce something recognisable!  My friend pointed out that as I could make the marks I should then be able to apply them to a drawing.


Having worked in the cut out shape, I felt that everything was getting a bit too neat and tidy, so just did a page of scribbles and doodles.


These marks are all made with a graphite stick.  I haven't used a graphite stick before but I enjoyed using it, I found it very smooth and free flowing on the cartridge paper.