Pages

Saturday 17 March 2012

Project 1 - Stage 2: Exercise 4

This exercise was really enjoyable.  I tried to do a selection of ideas from each section of the supplied list.

Rubbings:  Using a variety of household impliments - a cake slice, a plastic doilly, a grater, a stencil, a plastic lid, some sequin waste, some sticky lace tape.  I used a crayon to make the rubbings.


These are all images made from things I found outside - a grid, a clock, cement rendering and a rough plaster wall.


Wax Resist: Marks made with a pale wax crayon, then washed over with watery block paints.


Block Printing: This was a really fun - using all sorts of found objects to print with.  I used acrylic paint with a credit card, old wooden blocks, various lids, the end of a paintbrush and some old game pieces.  I then tried painting a block of colour and scratching into it with a comb and using the paint on the comb to make a pattern.


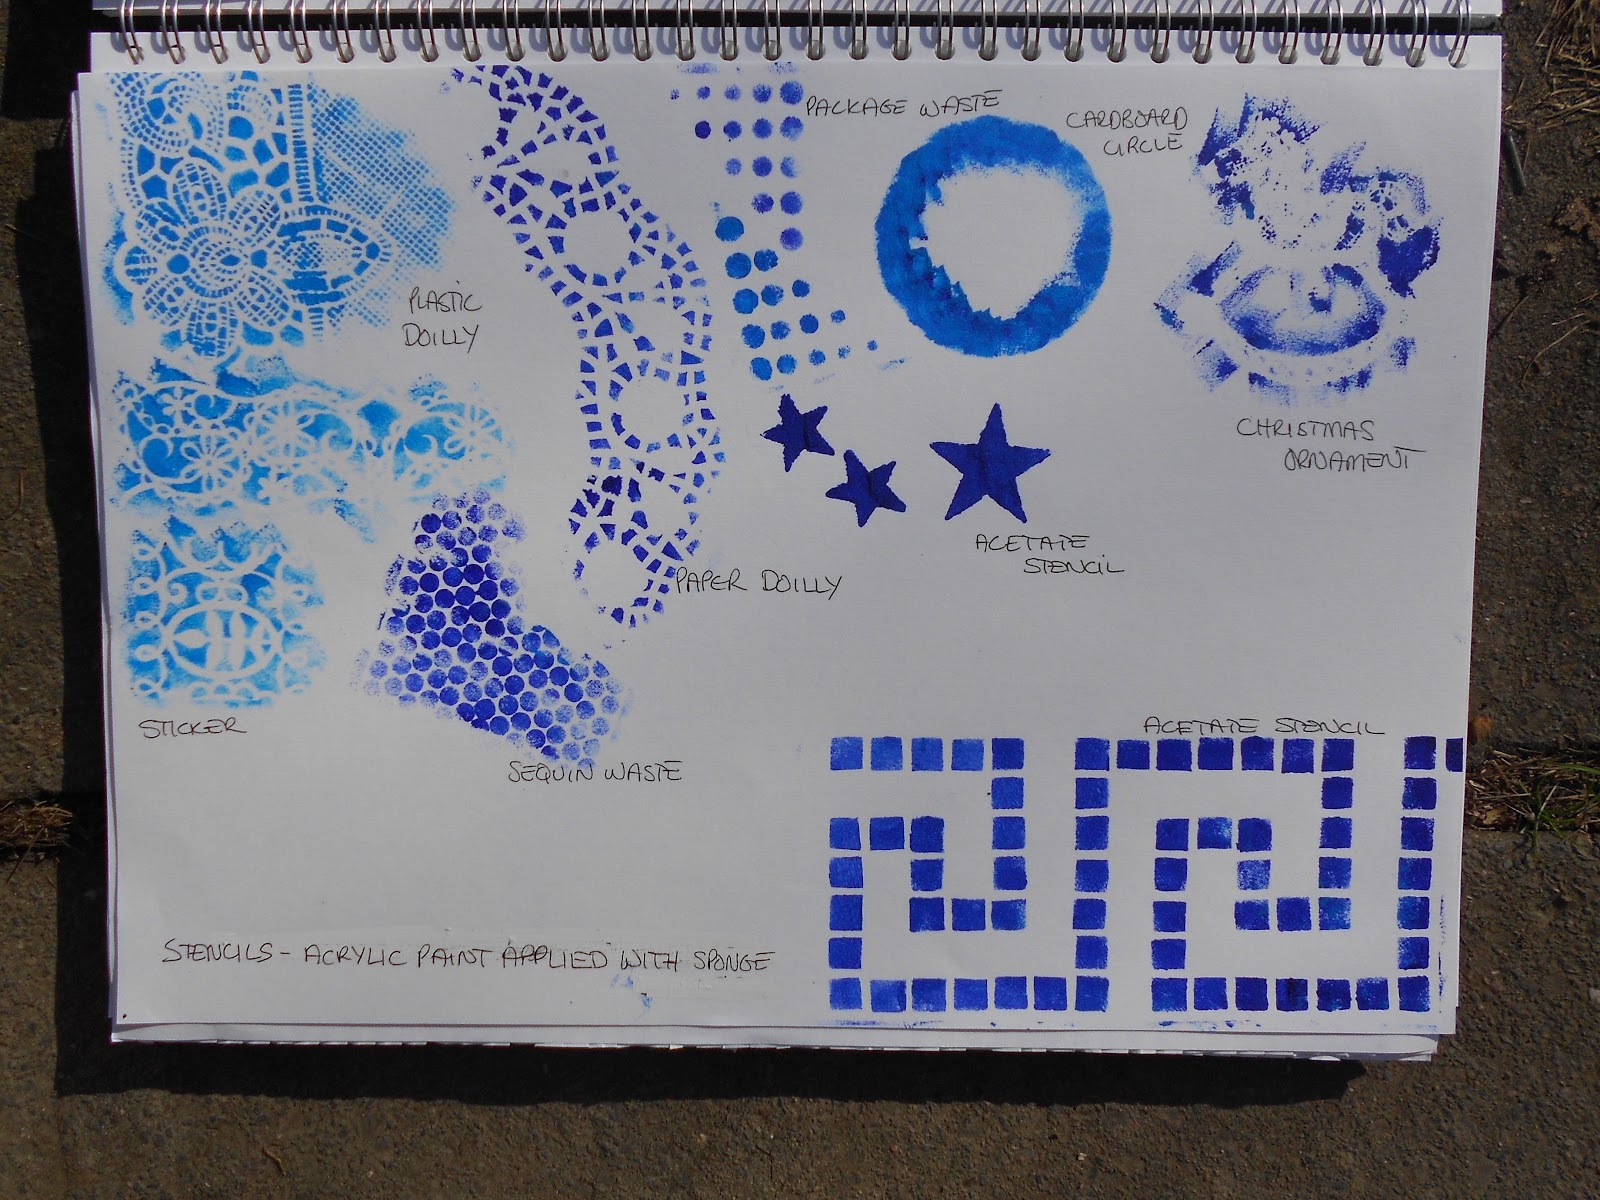
Stencils: These are all made using stencils.  I used a sponge and acrylic paint.  Some of the trials were not as successful as others.  I used a plastic doilly and a paper doilly, both of these were successful and made lovely clear patterns.  The sequin waste also made a nice pattern.  The circle of cardboard and the christmas tree ornament were not successful - OK for the shape but no detail on the ornament.  I think the acrylic paint was too thick.


Bleach: I painted bleach onto tissue paper, and a variety of other papers.  The bleach took the colour out of the tissue paper really well.  It didn't work quite so well on the other papers and some of the papers I tried it didn't work at all.  The sugar paper and the handmade paper both produced good results but the paper bag and the brown paper only produced faint marks.


Combing: I painted blocks of colour and scratched into the wet paint with a comb.  I also tried once they were dry using bleach over the top.


Transfer / Crayon Scratch / Rubbing Away / Collage: I didn't have any fixative so I made a transfer using nail varnish remover and an ink-jet print of a photograph.  I made two prints from this, the first one is good - dark colour lots of the detail transferred (I will try using a spoon to rub the image next time (I only used the end of a Pritt stick this time), the second print (from the same image) is pale and grainy but interesting.

The crayon scratch I didn't think I was going to enjoy, I found it quite hard work to get the black crayon to cover the other colours, but once I started scratching into it I liked the result.

I didn't think that the rubbing away would be as successful as it was.  I like the results, very subtle and I think I might try this in a drawing.


Project 1 - Stage 2: Exercise 3

Exercise 3 involved repeating exercise 1 using a wide variety of colouring materials.  I tried to use as many different techniques as possible.


After uploading a number of images, I have realised that it is better to work landscape in my sketchbook.  So they are going to be a bit mixed up to start with but any new pages will be landscape.


I am loving the fact that everything I have collected over the years is now being used - this is very satisfying.  In the past I have liked using the gel pen and the ink and coloured pencil for drawing.  However, having tried all the different mediums available - I found the block paints lovely to work with, they can be used thickly or like watercolours, they don't smudge or run, and once dry can be painted over.  I like the soft pastels but again they are messy but can be smudged and drawn over like the charcoal.  I also tried out a lot different papers.


I then collected all sorts of different papers and tried out as many different techniques as possible.


Again, the squares were getting a bit neat and tidy so decided to try a page of doodles using a charcoal stick.
I like using the charcoal stick, it is very messy but produces very satisfying marks.


I tried a selection of marks and used three different medium to compare the results.  The first row is made using a charcoal stick, the middle line is made using a fineliner felt pen and the bottom row using a graphite stick.  I really like the charcoal and the graphite, they make a lot of mess, but the range of marks and tones that can be achieved is great.


Project 1 - Stage 2: Exercise 2

This exercise involved using the pencils and creating tone.  


I found this quite a difficult exercise at first.  I always struggle to get  a nice smooth run from one tone to another.  I decided not to worry to much about that and just get the marks down on paper.  Looking back over the squares I really like the vortex shape made with an 8B pencil and the vertical lines made with the 4B.

Project 1 - Stage 2: Exercise 1

Making Marks In An Expressive Way
Using a variety of pencils, from 2H to 8B, I made marks to represent various words.


I really enjoyed this exercise.  Although a lot of the marks are very similar there is a wide variety of tones and shapes.  I found that the word I was trying to interpret made me hold my pencil in a particular way, and the amount of pressure I used to produce the marks was different for each word.  Drawing is not my strong point but I found the mark making much easier, no pressure to produce something recognisable!  My friend pointed out that as I could make the marks I should then be able to apply them to a drawing.


Having worked in the cut out shape, I felt that everything was getting a bit too neat and tidy, so just did a page of scribbles and doodles.


These marks are all made with a graphite stick.  I haven't used a graphite stick before but I enjoyed using it, I found it very smooth and free flowing on the cartridge paper.

Thursday 15 March 2012

Getting Started

Getting organised seems to have taken an inordinate amount of time.  Considering that most of my stuff is already  in one place, I have spent the last fortnight sorting and sifting and trying to create a more organised working space.  Not quite there yet but well on the way.