I created a Manipulating Fabric Board on Pinterest, to collect some ideas.
STAGE 1 - PREPARATION
My fabric samples are already sorted into colours and stored together. So I went onto Stage 2 and then just picked out any pieces of fabric that I thought would be suitable.

STAGE 2 - DEVELOPING DESIGN IDEAS
I chose six of my drawings/photographs to use for this stage of developing design ideas.

1. Old Horseshoes

I had already created a mood board for this photograph in Project 3; Stage 4 - Exercise 2. I love the texture and colours in this photograph of some old horseshoes that I find when I am digging in the garden.

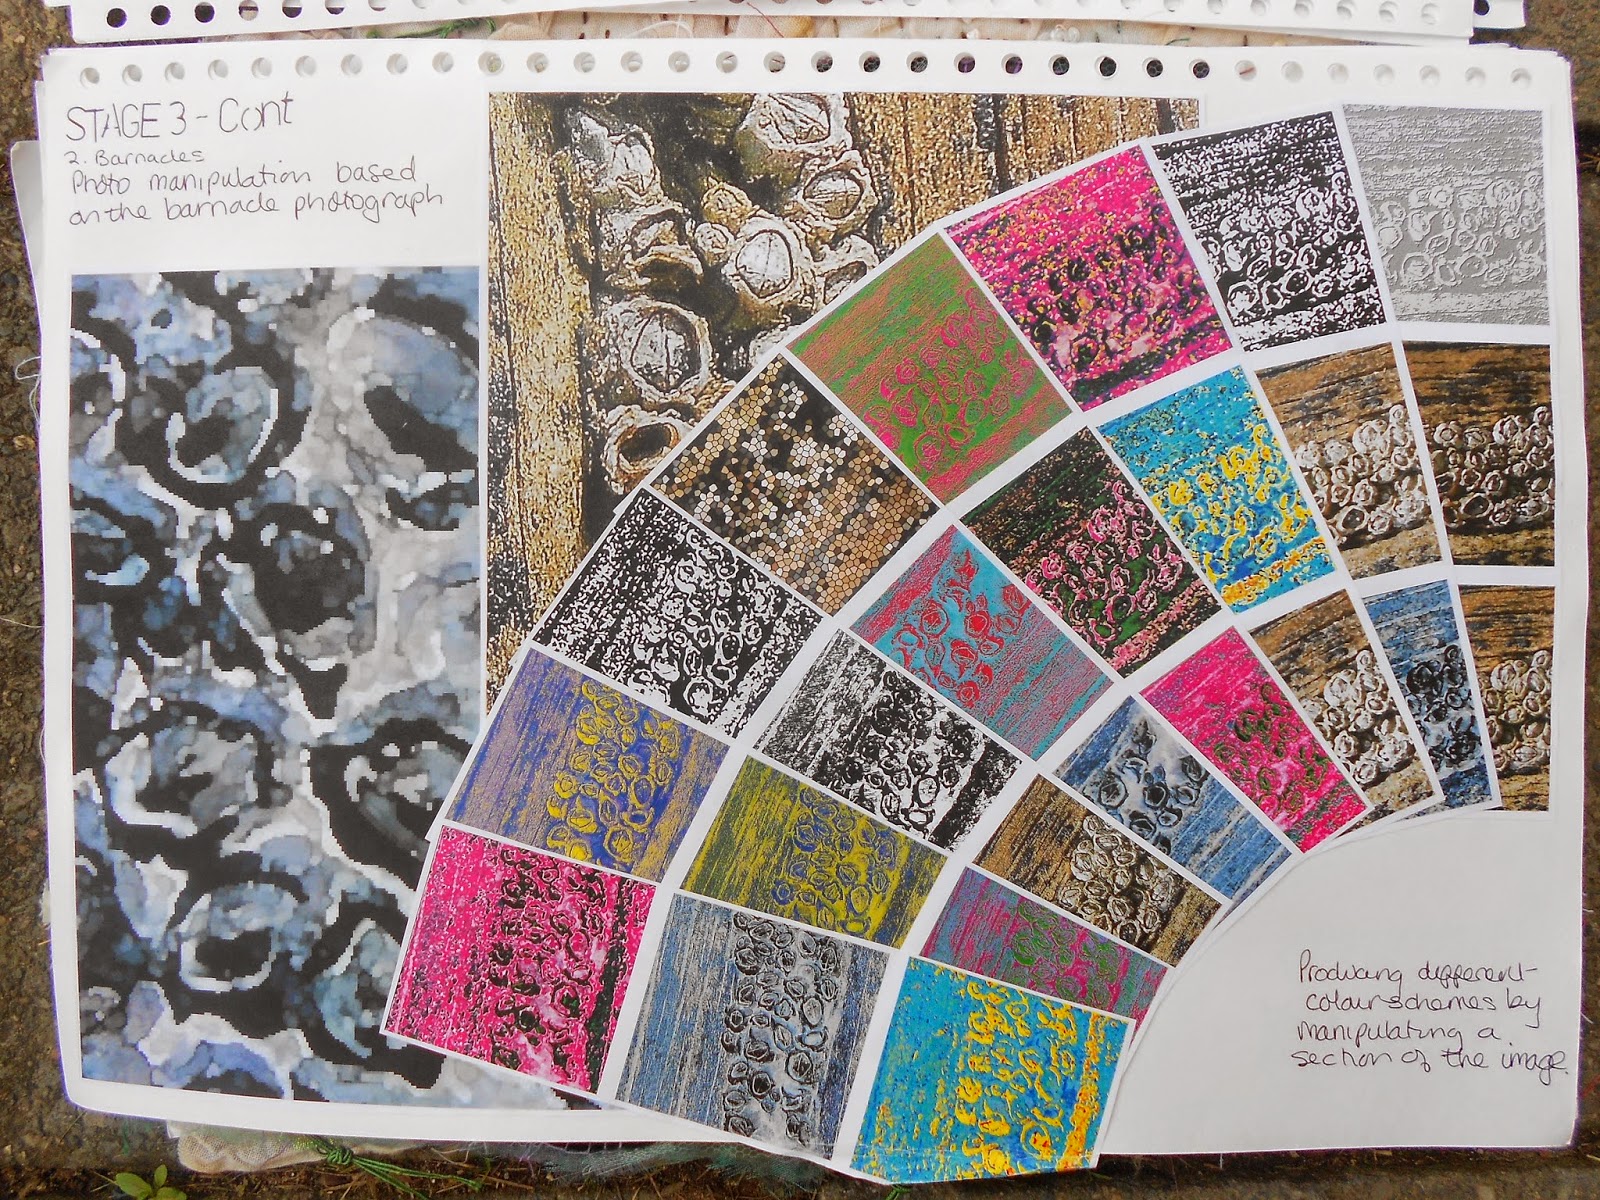
2. Barnacles

My second choice is from Project 3; Stage 6 - Exercise 2. I had taken this photograph of barnacles on a breaker on the beach at Barmouth.

I had developed this into some mixed media ideas and a French knot piece. And I felt that these ideas could definitely be developed further.
The next three choices are all from Project 3; Stage 4 - Exercise 1. I choose them because I liked the colours, the texture and thought that they could all be usueful starting points for further exploration.
3. Fire/Hot

4. Cold


6. My final choice was Stained Glass

This is a photograph I took of a series of seven panels of stained glass in The Brewery Arts Centre and Restaurant in Keswick. These hugh panels of fused glass represent seven themes associated with the centre - Visual Arts, Theatre, Dance, Film, Music and Food. They were designed and installed by Northern Lights Stained Glass (also from Keswick).


STAGE 3 - APPLIED FABRIC TECHNIQUES
I made two machine sewn samples using the fabrics I had chosen for the old horseshoe image and some knobbly wool. I am really pleased with the lower sample. I think this has picked up the colours and the textures of the original image. I also like the small sample with the hand stitching. I think both of these ideas could be developed further.


I continued making a number of small studies using various fabrics, buttons and beads.
I also created small appliqué pieces.

For the fire image I tried gathering and manipulating the fabric, but I didn't like how this was looking. I tried small strips of different fabrics held down with a simple running stitch. I was very pleased with how this turned out, so repeated the idea for the cool image. I think these samples are really successful.
For the calm sample - I manipulated the image with high contrast and then selected small parts to enlarge and re-colour. I then experimented with circles of fabric and nets and sheers.


Based on the paper collage of the stained glass - I created a piece using sheers, sheens and nets. I like the way the colours are changed by the overlay of the sheer layers and the glittery fabric shows through - giving the impression of the original glass.

To develop this further, I recoloured the image and enlarged it and then tried it in a different colour-way. The fabric sample is lots of squares of fabric, machine sewn in squares and then cut back to reveal the fabric below. I think the sample has worked well to represent the surface texture of the glass.

For my final sample for this stage - I chose the calm image. For the background I used a piece of dark purple velvet. On to this I layered strips of various sheens and sheers in greens, purples and lilac. Over the top of all the strips there is a piece of lilac net to hold everything in place and then a final piece of turquoise-green organza. I then cut different size circles out of various purple and green fabrics and used blanket stitch to hold them down. I used blue-green-grey thread for the running stitch on the background. I love the colours in this piece and am happy with how it has turned out. I think it is a good development from the original image.

STAGE 4 - RAISED & STRUCTURED SURFACE TEXTURES
GATHERING

1. Rectangle of fabric, single line of gathering in the centre
2. Rectangle of fabric, single line of gathering at each long side
3. Thin strip of fabric, double line of gathering in the centre
4. Small strip of fabric, folded into pleats, held down with running stitch
5. Circles of fabric stitched in the middle, pulled tight, bead added
6. Suffolk Puff - circle of fabric, gathered around the edge, pulled tight
7. Strip of fabric, folded, single line of gathering at edge.
8. Furrowing
9. Spot fabric, stitched around spots and pulled tight
10. Grid marked on fabric, stitched on marks and pulled tight

FOLDING & PLEATING
11. Smocking on a piece of gingham
The fabric wasn't really suitable for this and a piece of ordinary gingham would have been better.
12. Smocking on gingham
I used a piece of small check gingham to try out various sizes of smocking using the squares as a guide. This shows the various surfaces that can be created using different sized grids.
13. Smocking on a piece of plain cotton
This fabric was more suitable for this technique and for a first attempt I think it has worked well and gives a really good surface texture.
Again I used the squares in the fabric to create the smocked effect. I really like how this has turned out and the way it has broken up the squared surface of the fabric.

TUCKING
15. Pin tucks stitched down at both sides and stitch the opposite way in the middle
16. Circle of fabric with a hole cut off-centre and pin-tucked around the edge
17. Gingham fabric with random pin-tucks

TEARING, FRAYING & SLASHING
18. Layers of organza, machine stitched together and burnt into
19. Layers of fabric, stitched in lines at various intervals, slashed and machine washed to create the frayed edge. I had to cut a lot of the fraying off as it was taking over the sample.

QUILTING
20. A sandwich of cotton :: wadding :: velvet - stitched into with random French knots
21. A circle of muslin, with a gathered circle in the middle, stuffed with wadding
RAISED SHAPES
22. A piece of calico with 3D things stitched to it - various sized curtain rings, a shell, a bead, a button - with a piece of calico manipulated and stitched down over the top. Seed stitch and French knots added. A piece of moulded organza also caught down to add interest and texture.

MOULDING
I tried various fabrics - using a small elastic band to secure them - I tried different items to create shapes - marbles, glass nuggets and screws. I then steamed the fabric until it held its shape. Once the fabric was cool I left it to dry and then removed the elastic bands and shapes.
A SAMPLE
For my final sample I decided to develop the barnacle image.
I used a piece of muslin and a piece of striped organza. I fixed glass nuggets into these fabrics with small elastic bands I then soaked the fabric in a strong solution of coffee before steaming the fabric in the microwave until the fabric held its shape over the nuggets. When the fabric was cool, I left it dry and then removed the elastic bands and the nuggets.
The background fabric is a piece of poly-cotton. I cut the muslin fabric to the size required and then used the left-over pieces to fill in the areas that needed more raised shapes. I also attached the piece of organza to create a subtly coloured area.
I used dark brown thread in a running stitch to attach all the layers together and catch down the extra pieces.
French knots were then added where needed.
I am really pleased with how this piece has turned out. I like the addition of the organza, which has added an area of colour and texture. I also like how the coffee has stained the top of the nugget shapes more than the sides.

REVIEW OF ASSIGNMENT 3
How does working with fabric in this way compare with working directly with stitch?
I have really enjoyed this assignment. I like working directly with the fabric. I have enjoyed working with muslin, which is lovely and soft and easy to manipulate. I like being able to crease the fabric and ruffle it to create a textured surface on which to stitch.
Are you pleased with the shapes and movements that you have created in both appliqué and fabric manipulation? What would you do differently?
I am pleased with the work I have done. Both of the final samples have worked well and I have used a lot of techniques that I haven't tried before; smoking; quilting; raised shapes; furrowing. I wonder if I need to be a bit neater in my experiments. I have looked at other people's pin tuck samples and they are beautifully made.
How did the pieces work in relation to your drawings? Were the final results very different from the drawing? Did the fabric manipulation technique take over and dictate the final result?
I think the first experimental pieces were quite different from the drawings but had elements that were definitely related. Both of the final pieces were more like the drawings - although the fabric manipulation created a further dimension.
Was it helpful to work from the drawings in the appliqué exercise? Would you have preferred to play directly with cut shapes and materials?
I don't mind either way. I find it fairly easy to just pick up pieces of fabric and thread and play around with little ideas. Relating them to the drawings was harder but there was less choice to get distracted by.
How do you feel about working with stitch in general? Is it an area you would like to pursue in more depth? Do you find it limiting in any way?
I love working with stitch. I find hand-stitching very relaxing and the fact that you can pick it up at any time and that it is portable is very useful. I like the freedom of stitching and the ability to build up layers and textures. I don't really find it limiting at all - I think the possibilities are boundless.
No comments:
Post a Comment